

How To Render In Fusion 360
Fusion 360 is ofttimes commended for its ability to do both CAD and CAM in the aforementioned piece of software. Consequently, the Render Workspace Generates realistic renderings of the pattern. Use materials, scenery, and lighting. is often overlooked every bit a valuable piece of the total motion picture.
Different nigh of its competitors, Fusion 360 allows users to create photorealistic product renderings within the plan itself – deeming 3rd-party software unnecessary.
If you're fix to create eye-catching photorealistic renderings then be sure to follow these ten favorite tips of mine.
Tip #1 – Ready Your Lighting First
This is a tip that volition hopefully relieve (keyboard shortcut CMD/CTRL+S) Saves the file that is currently open. you a ton of fourth dimension. Ready your scene'south lighting before you commencement adding materials. Become the lights positioned the style you want, and so you lot only need to adapt your materials so they fit (keyboard shortcut "f6") Makes the current file fill up the screen. the light sources.
Calculation the lights later the materials result in you spending a lot of time tweaking both to get the scene to work.
Tip #2 – Relieve Your Favorite Materials
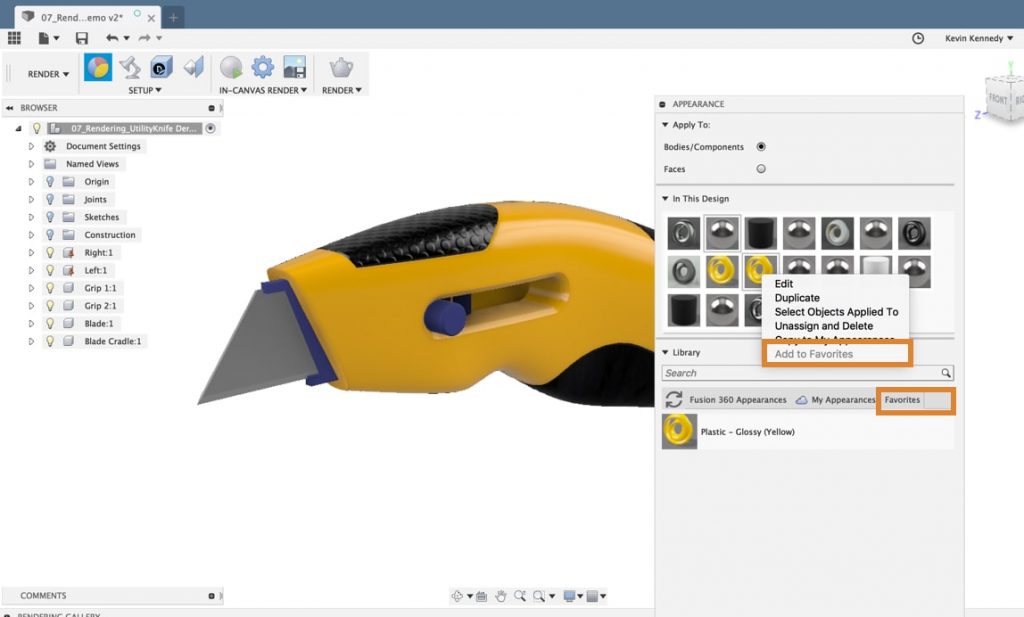
You tin save materials as "favorites" which tin help you lot speed up your workflow. This is particularly helpful when you take custom materials that take time to set. To save a material equally a favorite only correct click on the material and select The selection mode controls how objects are select when you drag in the canvass. "add to favorites."
You'll find your saved (favorited) materials nether the "favorites" tab within your material library. Yous tin always remove favorites if you notice your favorites tab getting too chaotic.
Tip #3 – Adding a Backdrop
The render workspace in Fusion 360 lets you cull the background color for your rendering. Notwithstanding, many times a solid groundwork color just doesn't cut it.
Consider creating a reusable CAD file that includes walls, floors, and other components. Re-employ this file any fourth dimension that y'all need to create a render that has a properties. Having your own pre-made walls will exist a huge do good. You lot'll be able to customize the material properties well beyond the native background properties.
Tip #iv – Save Your File Often
Creating an center-catching render in Fusion 360 tin accept quite a chip of time. Be certain to save your file ofttimes.
Part of creating an awesome product rendering is exploring new perspectives and possibilities with materials and lighting. Consider saving your file each time you create a new perspective or change the lighting effectually. This will allow you to go dorsum and explore those unique views later on on.
Tip #5 – Fillet all of Your Edges
Hold whatever product in your mitt and have a close look at Re-arranges screen to expect at selected object. it. You'll notice that all edges have a slightly rounded edge, even if they announced to exist squared off. Unless of course, your object is a sharp blade or knife, you'll want to leave the border without a fillet Places an arc of a specified radius at the intersection of ii lines or arcs. Select the vertex or the 2 lines or arcs. Specify a radius for the fillet. .
When nosotros render a production the software will create a small reflection of light which adds another level of particular. This extra reflection helps convince our brain that the object is real.
Tip #6 – Use a Good CAD Model
Using a high-quality CAD model can make all the difference between a fair and a good render. Sometimes you'll even detect it necessary to dissever a functional model for manufacturing and a CAD model tweaked specifically for rendering.
A CAD model made specifically for rendering may include details that are altered to expect better in the rendering software. Tiny textures, holes, and cloth thickness are all key factors in making the brain call up it'due south seeing a real photograph. Remember that hardly any surfaces are perfectly apartment. You'll detect that some textures are ameliorate added in the CAD file itself versus the rendering materials.
Tip #7 – Avoid Pure Colors
Stay away from colors that are besides pure. For example, you'll never desire to apply the color black at the finish of the spectrum – RGB (00,00,00). In the real earth, black never appears to be completely black because of lights and reflections.
Surfaces that use an absolute black will not reflect any light in the rendering software and volition create "black holes." Lowering the level of blackness will help the reflections await natural making the black color appear realistic.
This practice can exist used for but about every color. Try to stay abroad from colors at the terminate of the color palette.
Tip #8 – Update Your Models
Live updating is one dandy do good of using Fusion 360s rendering environment over a tertiary-party software. This means you tin update your original CAD model and improve areas as you run across fit.
It'due south hard to consider everything while creating your model. You lot'll discover that your lighting sources and materials tin can really change the way your model looks – often times making yous recognize areas that could be improved. Don't exist afraid to go back and forth between the Model and Render Workspaces.
Tip #9 – Use In-Canvas Rendering
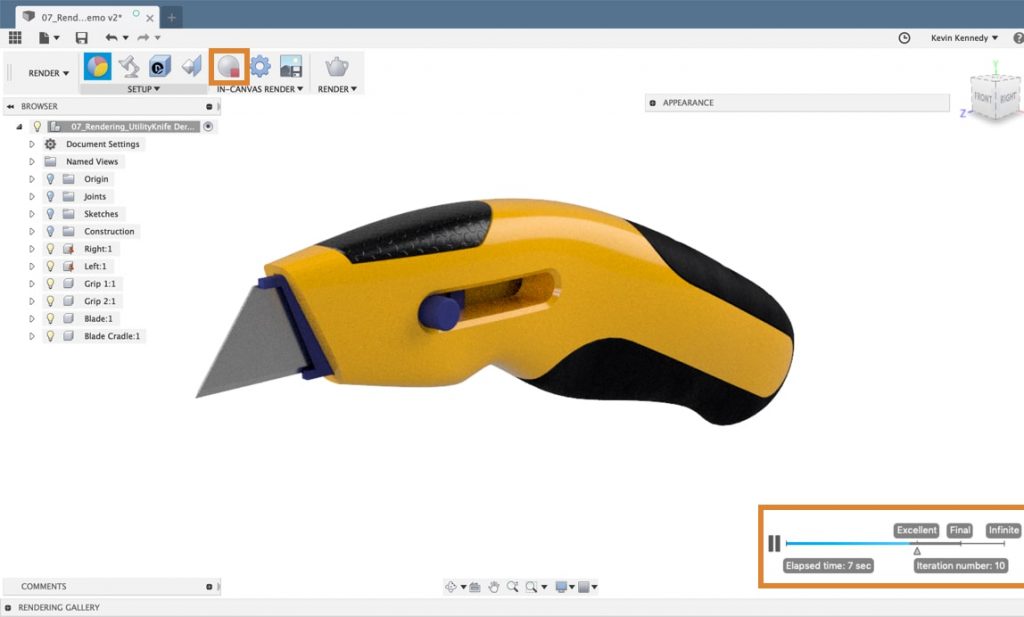
Unlike some rendering software, Fusion 360 allows you to come across a real-time preview of what the render volition look like. The best part – you can go along to update the render details.
Click the "In-Sail Rendering" push in the toolbar Use the Toolbar to select the workspace yous want to work in, and the tool you want to apply in the workspace selected. . You lot'll see that Fusion 360 will get-go to process your render. This does use a lot of your computer's RAM so I wouldn't recommend doing this all the time. But this feature tin can be particularly helpful equally you practice creating photorealistic renderings.
Tip #10 – Consider Mail service Processing
Fusion 360's Render Workspace has come along manner the last few years. However, I believe there will e'er be a need for some good post-processing in a photo editor such every bit Adobe Photoshop.
Consider doing some post-processing of the photo. You tin can tweak the lighting, add together fine text or other details that would go lost in the render, or add movement blur to change the focal point Creates a sketch indicate. of the render.
Source: https://productdesignonline.com/tips-and-tricks/10-tips-for-a-photorealistic-product-rendering-in-fusion-360/
0 Response to "How To Render In Fusion 360"
Post a Comment